Showing posts with label Back of the Package Recipes. Show all posts

Monday, August 1, 2011

Back of the (Giant) Bag: Rosemary Focaccia


I buy my bread flour at Costco in 25-lb. bags. I make pretty much all of our bread. Pretty lucky family, right, to come home to the smell of fresh bread and eat a piece hot off the loaf? Nope. The real treat is when I'm too busy to make hamburger buns or sandwich bread and they get to eat "store bought" bread. Grass is always greener, I guess...


So I was dumping my bag of flour into the giant storage bin I use to keep it, and noticed a recipe on the back for rosemary focaccia. We have rosemary growing as a ground cover and I certainly have enough flour--what the heck, I'll give it a try.


Rosemary Focaccia
3 cups bread flour
2 tsp. salt
1 Tbsp. sugar
1 Tbsp. or 1 package instant active yeast
1 1/3 c. warm water
3 Tbsp. vegetable oil
2 Tbsp. Parmesan cheese
2 Tbsp. dried rosemary leaves
Combine flour, salt, sugar, yeast, water, and 2 Tbsp. oil. Mix until dough is pliable. Knead on floured board until smooth. Place dough in oiled bowl, cover, and let rise until doubled, 45 minutes. Coat baking pan with oil and gently press the dough out to about 1/2 inch thickness. Brush remaining oil over the top.


Make dimples in the dough (clearly, this is the best part).


Sprinkle with Parmesan and rosemary. Let rise 20 minutes. Bake for 25 minutes at 375 degrees.

Janet's Notes: I made the dough in the bread machine, decreasing the water to 1 cup. I added fresh (not dried) rosemary straight into the dough, not sprinkled on top. I also used 1 Tbsp. loose yeast instead of one individual package because, you guessed it, I buy my yeast from Costco as well.

You have to take a photo with olive oil next to it; I think it's some kind of Italian bread photography rule.


Thursday, July 28, 2011

Back of the Tub: Kraft Ricotta Cheese


I had a bunch of ricotta cheese left over from the pizza earlier this week and decided to make the recipe on the back of the container. I wasn't sure whether I'd blog it because it is basic to the point of ridiculous, but my kids loved it and I had to laugh when Max declared it "the best thing I've ever eaten."

Here's the gist of the recipe: dump ricotta cheese in spaghetti sauce. The end.


Parmesan Bow-Tie Skillet
3 cups bow-tie pasta, cooked
1 jar (14 oz) spaghetti sauce
1/2 cup Simply Kraft Reduced Fat Ricotta Cheese
1 cup shredded mozzarella cheese, divided
1/4 cup grated Parmesan cheese, divided

Combine pasta, spaghetti sauce, ricotta, 1/2 cup mozzarella and 2 Tbsp. Parmesan in large skillet. Cook on medium heat 10 minutes or until cooked through, stirring occasionally. Remove from heat. Sprinkle with remaining cheeses; cover. Let stand 5 minutes or until mozzarella is melted.


Janet's Notes: I used macaroni because I didn't think bow-ties would stand up to 10 minutes of cooking after they'd already been cooked. I cooked my pasta just to the raw side of al dente and then reduced the cooking time to about 5 minutes. Nothing needs to be cooked, just heated.

If I had spent two hours on this meal they'd have hated it.

Tuesday, July 12, 2011

Back of the Bag: Mission Tortilla Strips


My daughter spotted this recipe and said I should give it a try. It took about 5 seconds to make and would be a great party appetizer.

Black Bean & Roasted Red Pepper Dip
1 pkg. (1 oz) taco seasoning mix
1 can (15 oz) black beans, rinsed and drained
1 jar (7 oz) roasted red peppers, drained
1 pkg (12 oz) light cream cheese
1 Tbsp. chopped cilantro
1 to 2 tsp. lime juice
Mission tortilla strips

In food processor, combine all ingredients except garnishes; mix thoroughly. Serve with Mission Strips and assorted raw vegetables. Makes 2 cups.


Janet's Notes: Even though the roasted red peppers were in the title, I went all rogue like Sarah Palin and substituted diced Ortega chiles. I also left out the cilantro because I don't like it, but that's just me. Also, my package of cream cheese is only 8 ounces. Not sure where I would find a 12-oz package because 8 ounces is the standard size that I always buy at the store, so I threw in 1/4 cup of sour cream so it wouldn't be too salty. The kids devoured this.

Wednesday, June 1, 2011

Back of the Box: Pasta with Artichokes and Butternut Squash


It's been a while since I've done a back of the package recipe, so I did a little searching in my pantry and found this box of shells, with a good-looking recipe on the back. If only I had butternut squash and baby artichokes lying around, I wouldn't have to go to the store but alas I found myself searching the produce section yesterday. Butternut squash was no problem but the baby artichokes were nowhere to be found. Second store, jackpot! A little pricey though at $6 per pound...asparagus or sugar snap peas would probably make a good substitute.


Barilla Pasta with Artichokes & Butternut Squash
1 box Barilla Medium Shells - Conchiglie
1 butternut squash, diced
4 Tbsp. extra virgin olive oil
1 medium onion, diced
2 cloves garlic, chopped
12 baby artichokes, quartered
Salt and black pepper to taste
1/2 cup Parmigiano Reggiano cheese, shredded
1 Tbsp. parsley, chopped

Preheat oven to 400 degrees. Bake butternut squash until slightly brown and cooked through, about 15-20 minutes. Bring a large pot of water to a boil. In a large skillet, heat olive oil and saute onions for 3-4 minutes until translucent. Add garlic and saute for 2 minutes. Then add artichokes, season with salt and pepper and cook for an additional 3-4 minutes. Combine with roasted squash.

Cook pasta according to package directions (8 minutes). Drain pasta, reserving 1/2 cup of the water. Add liquid to sauce and stir well. Combine pasta with sauce and top with cheese and parsley.

By the time I had cut these and got the camera out, they were already starting to brown. Soak them in cold water if you want to prep them ahead of time.

Janet's Notes: If you haven't ever eaten baby artichokes, you're in for a treat. Take off all the tough outer leaves until you get to the soft inside leaves; they'll be a pale whitish-yellow. Cut the top off to remove any thorny leaf ends, and the bottom of the stem, and then quarter to use for the recipe. (There is no choke to remove.) Most Trader Joe's stores sell them, though they weren't there the last time I went. Don't you hate it when Trader Joe's stops carrying items you count on? Sorry, still bitter from the ground turkey breast discontinuation of '08.

Also, I overcooked the squash so it mushed instead of staying in chunks, which turned out better in the end--the kids got some nutrition in spite of themselves.


Verdict: Good, simple, and healthy weeknight meal. I added meatballs but if I had gourmet chicken sausages I would have done that instead.

Tuesday, April 19, 2011

Back of the Box: Minute Rice


I'm Chinese, and I think it's unethical--and quite possibly illegal--for me to make Minute Rice. So I was as surprised as anyone when I found myself standing in line for a chance to spin the wheel and win a prize from the Minute Rice booth at a charity walk a few weeks ago. Even more surprising was how embarrassingly giddy I became when I won a full-size box of Minute Rice, and all the losers around me just got refrigerator magnets and pencils. Ha!

I came home, put it in my pantry, and never gave it another thought, until today when I was trying to come up with a dinner that would not require a trip to the store. On the back of the box was a recipe for Parmesan Crusted Chicken. I have Parmesan! I have chicken! The only thing I didn't have was asparagus, but as it turned out, the recipe just said to serve the asparagus on the side. As if we can't think of our own side dish? Sheesh.

Parmesan Crusted Chicken
2 cups Minute Brown Rice, uncooked
1 can (14 1/2 oz) chicken broth, divided
1/2 cup water
6 butter crackers, finely crushed (double this)
2 Tbsp. Parmesan cheese, grated (double this too)
4 boneless, skinless chicken breasts
2 tsp. oil
1/2 cup chive and onion cream cheese
3/4
lb. asparagus spears, trimmed

Prepare rice according to package directions, using 1 1/4 cups of broth and water. Meanwhile, mix cracker crumbs and Parmesan cheese on the plate. Rinse chicken with cold water; gently shake off excess water. Dip chicken in crumb mixture, turning over to evenly coat both sides of each chicken breast with the crumb mixture.

Heat oil in nonstick skillet on medium heat. Add chicken; cook 5 to 6 minutes on each side or until golden brown on both sides and cooked through. Place chicken on serving platter; cover to keep warm. Add remaining 1/2 cup broth and cream cheese to same skillet. Cook on medium heat until mixture just comes to a boil, stirring constantly. Simmer 3 minutes or until sauce is thickened, stirring frequently. Serve chicken over rice. Spoon sauce over chicken. Serve with asparagus.


Rating: Weird. This is the strangest back of the box recipe I've ever seen. It's just telling you to cook rice, and serve it next to other things. The chicken recipe really has nothing to do with the rice, and why tell us to serve it with asparagus when we might prefer peas, or corn, or beans? Seems like rice should be an ingredient in the recipe. However, nitpicking aside, the chicken was good, and the sauce was delicious, considering how easy it was to make.

Wednesday, April 13, 2011

Back of the Can: Breakfast Casserole

Evaporated Milk: It's what's for breakfast.
Carlsbad 5000 weekend! This annual race is a big deal in our town. Runners from all over the world come for the "world's fastest 5K" but the day before the big race, it's all about the kids. The Jr. 5000 is an annual tradition for many families here, including ours, starting when they register for the "diaper dash" and all the way up to age 12.

That guy on the left can't believe his eyes when my daughter flies past him. It's like a bolt of lightning!

Max and his buddy, collecting their first place medals (along with a zillion other kids).

Clashing mightily with the 5000 this year is Sean's favorite tradition, "good breakfast" day. I've somehow been suckered into making him some combination of meat, eggs, and potatoes once a week. So while he slept in (he's 15 now and has done his time at the 5000) and the little kids got ready, I mixed up a quick batch of this breakfast casserole from the back of the Carnation Evaporated Milk can.

I put it in the oven when I came home but what I didn't realize was how long it took to cook: one hour. We were starving by the time it was ready.

Rating: Not that great but has potential. Really, what is there to mess up? But the fat free milk gave it a really weird chemical taste. I think Carnation's recipe would have been great, had we substituted half and half or regular milk for the Carnation. Should I suggest it to them?

Hash Brown Casserole

2 cups shredded cheddar cheese
6 large eggs, beaten
1 can (12 oz) Carnation Evaporated Fat-Free Milk (make it regular milk and you'll be a lot happier)
1 tsp. salt
1/2 tsp. black pepper
1 pkg (30 oz) frozen hash brown potatoes (I just used 4 potatoes, shredded)
1 medium onion, chopped
1 small green bell pepper, chopped (I used a combo of different colored bells)
10 slices turkey bacon, cooked and chopped (I used sausage)

Preheat oven to 350 degrees. Grease a 13x9-inch baking dish. Combine cheese, eggs, milk, salt, and pepper in large bowl. Add potatoes, onion, bell pepper, and bacon. Mix well and pour mixture into baking dish. Bake 1 hour or until set.

Tuesday, April 5, 2011

Back of the Bag: Sopes

We eat a lot of Mexican food here in Southern California, and masa is a staple in my house.

Sopes are kind of like tostadas, but the tortilla part is a lot thicker and softer, like a flat cornbread. Once I ate at a place that called the thick tortillas "huaraches" which means sandals, but hopefully you will like these a whole lot better.

To make "huaraches":
Combine 2 cups masa, 1/4 tsp. salt, and 1 1/4 cups water. Mix thoroughly for about 2 minutes to form a soft dough.

Divide masa into 20 portions and roll into balls. Cover with plastic wrap to prevent drying.

Preheat ungreased griddle to high temperature. Place a ball between two sheets of heavy-duty plastic wrap. Roll out or flatten ball to form a 3" diameter circle (if you have a tortilla press your life will be much easier) and about 1/2 " thick. The thickness is more important than the diameter.

Cook sope for one minute on the preheated griddle. Turn and cook the second side until lightly browned.


Heat 3/4" oil in a frying pan and fry sopes until lightly golden and drain on paper towels (I skipped the frying step to keep it healthy but if you can spare the calories, they'll definitely be more delicious).

Top sopes with anything you want: keep them traditional with refried beans, cooked chicken, chopped tomatoes, onion, cheese (if you live in an area that sells queso fresco, I highly recommend it), lettuce, and sour cream. Or go a little wacky and use soy chorizo cooked with onion and potato, and cheddar cheese--this also makes a great breakfast.

Wednesday, March 30, 2011

Back of the Box: Oven-Fried Chicken

Today's back of the box recipe is a pretty standard idea but you can count on the fact that your kids won't make yuck faces when you serve it. How's that for a glowing review?

Oven-Fried Chicken
2 Tbsp. butter, melted
2 large eggs, beaten
2 Tbsp. milk or water
1/2 cup Albers white corn meal (yellow is fine too, it's just a different box)
1 cup flour
1 1/2 tsp. salt
1 1/4 tsp. paprika
3/4 tsp. garlic powder
3/4 tsp. black pepper
2 1/2 - 3 lbs. chicken, cut up and skinned


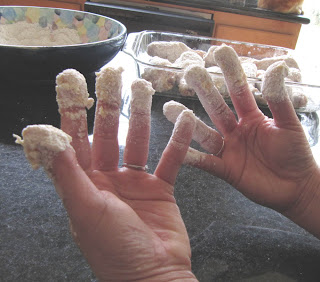
Preheat oven to 400 degrees. Melt butter in a glass casserole dish. Combine eggs and milk in a medium bowl. Combine dry ingredients in another bowl (I'm kind of making this up since I threw away the box and cut off part of the instructions when I took the photo. It's pretty basic.). Dip chicken in egg mixture, then into corn meal mixture.

Pretend to hug your kids with your dough-ball fingers.


Place chicken in buttered casserole and bake 45-50 minutes, until chicken is done. About halfway through baking, baste tops of chicken with pan juices so they will brown.

I served this with steamed broccoli and roasted purple sweet potatoes that I got at the Asian market. They were actually the best part of the meal, and as soon as I go back there (the store is in San Diego, about 30 minutes away) I'm going to do a post about them too.

Monday, March 21, 2011

Back of the Container: Ricotta Pancakes

My son, carbo-loaded on Ricotta Pancakes at his very first high school track meet. Look at that kid fly!

My son is running track and had his first meet ever on Saturday. I have heard of "carbo loading" but as a nervous newbie track mom, may have gone a little overboard. I made lasagna and then had about half a container of this cheese left, turned it over and saw a recipe for Heavenly Ricotta Pancakes. More carbs! Why not?

The recipe calls for 1 1/4 cup complete pancake mix (bleh), 1 1/3 cups milk, and 1 cup ricotta. I used my failproof Fannie Farmer pancake recipe (I'm sure you have a favorite too) and just added the cup of ricotta to the batter, and cooked as usual.

Your batter will be thicker than normal.

The thicker batter will make about a dozen pancakes, but since they were dessert for us, it was enough.

I threw about 2 cups of frozen blueberries in a small saucepan and added 1/4 cup of water, 1/4 cup sugar, and simmered them for about 5 minutes. I thickened the sauce with a cornstarch/water slurry (about 1 teaspoon cornstarch to a few Tablespoons water), poured it on top of the pancakes, and dusted it with powdered sugar.

These were so good. They were really tender and light and quick to make. And speaking of light and quick, I'd like to say that photo of my son running all alone was him way out in front of the competition because of his mama's love, but in actuality he was bringing up the rear. Oh well. He was the cutest.

Tuesday, March 15, 2011

Back of the Can: Orchid Coconut Milk

I'm starting a new regular feature today. About once a week I'm going to cook a recipe that comes on the back of the can/box/package. You know, those recipes that you never cook, or even consider cooking. Who knows, maybe there are some gems out there.

Today it's Orchid Coconut Milk.
Pa-Naeng Neua (Beef curried in sweet peanut sauce)

400 grams beef, cut into thin strips (I don't know how much this is but I used 1 lb.)
2 cups coconut milk (Why your recipe would call for 16 oz of coconut milk when your can contains 14 oz. I'll never understand...)
1 thinly sliced red spur chilli (sic)--what is this? A little chopped jalapeno will have to suffice
1/2 cup ground roasted peanuts
6 kaffir lime leaves, torn into pieces (I put in a little lime juice and zest instead of the leaves)
3 Tbsp. sugar
1/2 tsp. salt
2 1/2 Tbsp. fish sauce
1/4 cup sweet basil
3 Tbsp. pa-naeng curry paste (I used green curry paste because it's what I had)

What it says to do: Put 1 cup coconut milk over medium heat until some of the oil surfaces, add the curry paste and slowly bring to a boil, stirring constantly. Put in meat strips and cook for 5 minutes, add 1 cup coconut milk. Meanwhile, in a bowl, mix the rest of the ingredients except lime leaves. Add this to the curried meat, stir well and simmer about 15 minutes. Add the lime leaves, sweet basil, and remove from heat.

What I actually did: Pour entire can of coconut milk in pot; heat for about two minutes until you get bored of waiting for oil to surface, then put in curry paste, meat, and all other ingredients except basil. Throw in some chopped bell pepper and onion because beef and coconut milk do not satisfy your childrens' nutritional daily requirements. Simmer for about 15 minutes, then add basil.

The verdict: This was surprisingly delicious. I was so ready to bag on the idea of just throwing a bunch of stuff into broth without sauteeing anything first but cooking the beef in the liquid gave it a great flavor. And the whole thing took me literally 5 minutes to prep, and then 20 minutes total cooking time (mostly simmering which leaves you free to clean the kitchen). A back of the can winner!