Friday, October 17, 2014

Momofuku Milk Bar Chocolate Chip Cornflake Marshmallow Cookies: Problem Solved


Google the word Momofuku and you will discover a whole society of zealots who have devoted themselves to recreating and perfecting the New York City bakery's Chocolate Chip Cornflake Marshmallow cookie. 

I found this out as I searched the Internet for a cookie I could bring to my college son's cross country meet. I wanted the cookie that would have the team hoisting Sean on their shoulders while they sang "For His Mom's a Jolly Good Fellow." 

The Momofuku Milk Bar's Chocolate Chip Cornflake Marshmallow Cookie is basically a chocolate chip cookie with marshmallows, but the thing that grabs your attention is that you make kind of a cornflake cluster thingy and mix that in. It's unique enough to make you have to try them.

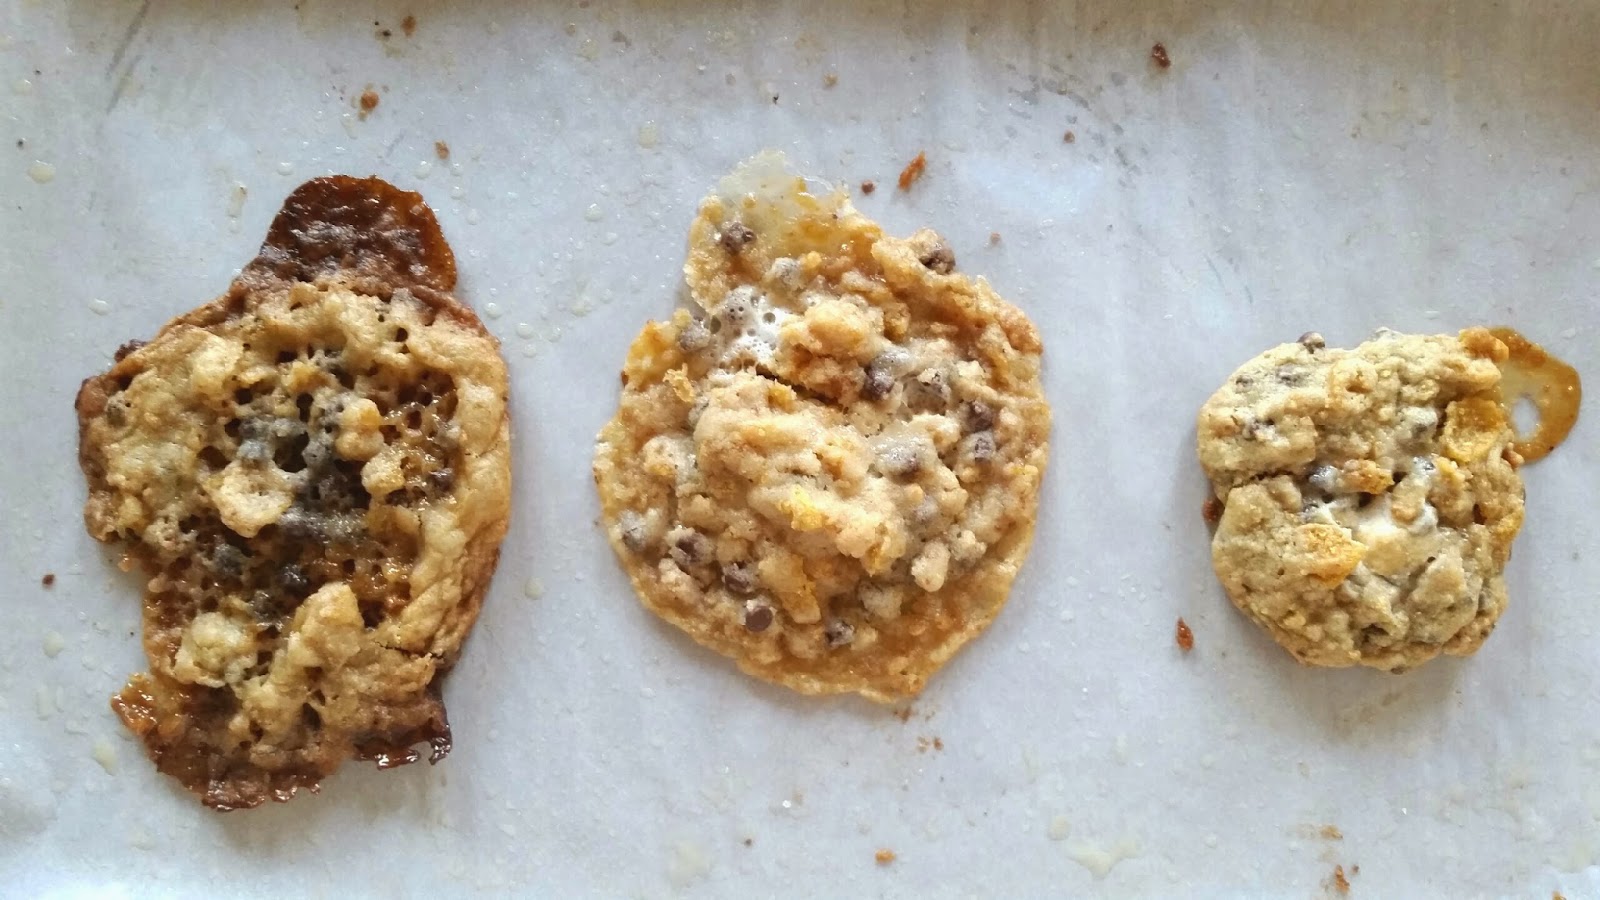
The problem, you find out soon enough, is that the cookies tend to spread and flatten, and while they still taste great, they look horrible.

So people have devoted many hours and wasted sticks of butter to getting them to stay cookie-like and presentable. There are various methods of chilling the dough, freezing it, making smaller or larger cookies, adjusting the oven temps, etc.

So I bought in. I made a batch, and chilled the dough for an hour before I baked it. Here is the unhappy result:


I then made a special trip to the grocery store for more butter, chocolate chips, sugar and a head of cauliflower so the cashier wouldn't judge me.

I made a new batch of dough, chilled the whole damn thing overnight, then popped 6 raw cookie balls in the freezer for 15 minutes. I baked them at 325 degrees for 10 minutes. The result: a raw center and equally flat and spread out edges.


Determined to show these cookies I was boss and if I said "Don't spread" I meant it, I threw (close to literally) the dough into muffin tins and baked those at 350 for 14 minutes. 


Not too bad actually, but pretty greasy and the marshmallows stuck to the side of the tins. Plus, I'm pretty sure cookie muffins would result in Sean sitting alone in the seat just behind the driver on the bus ride home--you know, the one where the driver stares at you in his giant rearview mirror the whole ride.

Then it dawned on me. Really, the great part of this recipe is the cornflake crunch. Why is everyone jumping through hoops to make the dough work, when it really is just a basic chocolate chip cookie dough with a way-too-high butter to flour ratio? So I decided to make my tried and true Neiman Marcus cookie recipe and add in the cornflake crunch and mini marshmallows. 


Can I get an amen? No chilling, no staring at them through the oven door to make sure I get them out at the exact right second, and most importantly, no more trips to the store for another head of cauliflower.

Neimanfuku Chocolate Chip Cornflake Cookies
(a hybrid adaptation of Christina Tosi's recipe in the Momofuku Milk Bar cookbook and the Neiman Marcus cookie recipe)

1 cup butter
1 cup brown sugar, packed
1 cup granulated sugar
2 eggs
1 tsp. vanilla
2 cups flour
2 1/2 cups blended oatmeal
1 tsp. baking powder
1 tsp. baking soda
1/2 tsp. salt
12 oz. mini chocolate chips
3 cups cornflake crunch
1 cup mini marshmallows

Measure oatmeal and blend in a blender to a fine powder. Cream butter with sugars; add eggs and vanilla. Mix together with flour, oatmeal, salt, baking powder, and soda. Add chocolate chips, marshmallows, and cornflake crunch. Place one-inch balls of dough at least two inches apart on silpat-lined cookie sheet and bake at 350 degrees for 10 minutes. 

Cornflake Crunch (recipe by Christina Tosi of Momofuku Milk Bar)

5 cups cornflakes
3 tbsp. sugar
1 tsp. kosher salt
9 tbsp butter, melted

1/2 cup milk powder
Heat the oven to 275 degrees. Pour the cornflakes into a medium bowl and crush them with your hands to one-quarter of their original size. Add the milk powder, sugar, and salt and toss to mix. Add the butter and toss to coat. Spread the mixture on a parchment-lined sheet pan and bake for 20 minutes, at which point they should look toasted, smell buttery, and crunch gently when cooled slightly and chewed.
Cool completely before using. It will keep for a week; up to a month in the fridge or freezer. Makes 4 cups.


Friday, January 27, 2012

Birthday Party Centerpiece: Candy Dipped Cones


Birthday centerpiece filled with Elise's favorite candies

About two seconds after I came across this idea for Christmas cones filled with candy and hung from a Christmas tree, I saw the potential to adapt it for any occasion. Dip the edges in white chocolate, then red and pink sprinkles and fill with Conversation Hearts for Valentine's Day, jelly beans for Easter, red, white and blue M&Ms for Fourth of July...

The only issue was how to hang the cones. Obviously not from a Christmas tree, but I thought one of those wire cupcake holders could work, inserting a big waffle cone into each opening. The only problem was that Target didn't have any, so we ended up tying the cones to my jewelry holder.

We put these on the dining room table and the guests at Elise's birthday party loved the unique (and tasty!) centerpiece.

Birthday Candy Cones
1 box sugar cones (waffle or regular size, depending on your holder)
White chocolate chips
Sprinkles in your choice of color
Thin ribbon (we used curling ribbon but if I had been up for a trip to Michaels I'd have bought some thin fabric ribbon)
Bamboo skewers
Assorted small candies

This project is really easy--the only tricky part is getting holes drilled through the side of the cones without cracking them. After some trial and error, I put a tiny drop of water where I wanted the hole and let it soak in. Then I used a bamboo skewer and gently pushed it while twisting until it broke through.

Melt about 1 cup of white chocolate chips with a Tablespoon or so of cooking oil. Dip the top edges of the cones in...

...then immediately roll them in a bowl of sprinkles.

Insert a skewer all the way through the cone and hang them inside a drinking glass to dry. Thread the ribbon through and tie knots inside the cone.

Hang and fill--super fun, super easy, yum yum!


Monday, January 23, 2012

Party Decorating on a Budget

Happy 13th birthday Elise! An occasion this big calls for a big party, so that's what we did. My next several posts will be on things we did for the event.

First: decorating the house. It really needs to look like a party, but decorations can get expensive quickly. We rely on crepe streamers and balloons to create the atmosphere for under $10. If you are all high falutin' and need everything to look Martha Stewart-ish, this is not the DIY for you. Our parties are very homemade (read: crooked, mismatched) and the kids are in charge of where things go and what colors to use.


Usually we put up the streamers in the usual way but this year Max had the idea to hang them across all the doorways like a curtain. (I think his motivation was to be able to climb the ladder.) Except for a strand of clear mini lights that we forgot to put in the attic with the rest of the Christmas stuff, balloons were the only other thing we used to decorate.

These balloon strands are a great way to save money on helium balloons, which are pretty costly for the few hours they last. You can either hang the strands across a doorway (or room if you've got the time), or just hang them from the ceiling. They make a huge impact either way.


To make the balloon strand:

1. Cut a piece of curling ribbon (the cheap stuff from the dollar store) a few feet longer than you want your strand to be.

2. Make a loose half knot and tie it tightly around the inflated balloon.


3. Make another loose half knot a few inches down the ribbon and tie another balloon on. Repeat.


Pretty simple. The closer you tie the balloons together, the fuller the strand will look.

Ready to party!

Wednesday, January 18, 2012

A Thousand Words: Disappointment

All Max wanted for Christmas this year was a coconut. For months we had been watching Survivor and they are always hacking them open and drinking the milk out of the shell. So when he found one under the Christmas tree, he was ecstatic. We went to the back yard, hit it with a hammer, and he took a gulp.

DANG IT!

Monday, January 16, 2012

Whole Wheat Peanut Butter Pumpkin Bread


I have had a can of pumpkin in my pantry since before Thanksgiving. I planned to make an extra pie to surprise my son Sean since it's his favorite, but it never happened. Don't tell Sean. So, on my mission to use the stuff that's been sitting in my pantry forever (which I plan to make a new recurring theme in This is Beige), I went searching for a good way to use it.

My friend Google informed me that pumpkin is very low in calories, but incredibly rich in poly-phenolic antioxidants like leutin, xanthins and carotenesa. OMG! My new year's resolution is to eat more leutin, xanthins, and carotenesa, but then again, whose isn't?

I found this good-looking yam bread recipe in my trusty Bread Machine Magic cookbook. I changed the ingredients kind of a lot (which makes it my own recipe now, right?), increasing the milk, substituting pumpkin for the yams, cutting the butter down and adding peanut butter, and also including some whole wheat flour to boost the fiber a little more. This is more of a sandwich type of bread, not cakey like banana bread. It would be good toasted with some cream cheese or jam for breakfast.


Whole Wheat Pumpkin Bread (loosely based on I Yam What I Yam Bread from the Bread Machine Magic cookbook)
2/3 cup milk
1 egg
1/2 cup canned pumpkin
1/3 cup peanut butter
2 cups white bread flour
1 cup whole wheat flour
1 1/2 tsp. salt
1 Tbsp. butter
2 Tbsp. brown sugar
1/3 cup mini marshmallows
1 1/2 tsp. yeast
Put all ingredients in bread machine on dough cycle. Transfer dough to a bread-sized loaf pan and cook at 400 degrees for 25 minutes. Makes a 1 1/2 lb. loaf.

Janet's Notes: The kids ate this bread like there was no tomorrow. I planned to toast it and spread it with some cream cheese or jam but they ate it straight off the loaf. No butter, no nothing. I thought the marshmallows would stay chunky, like chocolate chips, but they melted away in the dough and just added a little more sweetness.

Monday, January 9, 2012

Back in Beige


Oh how I have missed my little blog. Trying to write 5 posts a week, keep up with a small business, and have three restless kids home on summer break became too much for me and something had to give. Since the blog was the low man on the totem pole, so to speak, I took a break from it in August.

But every few days or so, I'd see/make/cook something that I would think, "I have to blog about that" but then remembered I was now blogless. The other day I was waxing nostalgic about
This is Beige when my daughter, in her infinite 13-year-old wisdom, said, "Why don't you just blog when you want to?"

Huh. Is that an option? You mean that a blog that has no sponsors, and doesn't pay, and that I am in full control of, can actually be on my terms? My daughter is a freakin' genius.

So
This is Beige is back. On a regular-ish basis. So check in every few days or so, or sign up to receive my posts via email (there's a spot to sign up over there--->, in the right hand column) and thank you to all you nice people who said, "Hey, how come you're not blogging anymore?" and made me rethink my decision.

Friday, August 26, 2011

Chocolate Coconut Haupia Pie Inspired by Ted's Bakery

Elise with the original from Ted's Bakery (via Foodland supermarket).

Before I left for Hawaii a couple of weeks ago, I made sure I had all my important papers together. Plane tickets, check. Hotel reservation, check. List of the best places to eat on Oahu, cut out of a Sunset magazine article by my friend Trish, check and double check.

One of the must-try items on that list was the chocolate haupia pie from Ted's Bakery. We didn't make it to Ted's but did happen to see it prepackaged for sale in the grocery store, so I bought a piece to try. It was so good I knew I had to try recreating it at home.

For those who don't know, haupia is a firm coconut pudding. You make it in a pan and then cut it into squares and eat it with your fingers. It's a popular thing to have at luaus; the pie is a super easy and fun treat that would be great at a casual potluck or dinner party.


Janet's Chocolate Haupia Pie
Make a one-crust recipe of your favorite pie crust, and pre-bake it. Pour the hot haupia into it and chill until set. Add your favorite chocolate pudding (I must confess to using a box of instant Jello chocolate pudding) and pour on top of haupia, again chilling until set.

Top with whipped cream and toasted coconut.


Cut one piece for the photo, then take the rest to your parents to ensure your status as favored child.

Haupia (source)

2 cups coconut milk
1-1/4 cups water
2/3 cups sugar
1/2 cup cornstarch

Combine the coconut milk and water. Stir until smooth. Add the sugar and cornstarch. Cook over low heat until thickened and shiny. If the haupia is grainy, you need to keep cooking the mixture because the fat in the coconut milk has not yet melted.

If you have any chocolate pudding left over, be sure to smear some on your face to resemble a goatee and mustache.