Showing posts with label Cooking. Show all posts

Monday, January 16, 2012

Whole Wheat Peanut Butter Pumpkin Bread


I have had a can of pumpkin in my pantry since before Thanksgiving. I planned to make an extra pie to surprise my son Sean since it's his favorite, but it never happened. Don't tell Sean. So, on my mission to use the stuff that's been sitting in my pantry forever (which I plan to make a new recurring theme in This is Beige), I went searching for a good way to use it.

My friend Google informed me that pumpkin is very low in calories, but incredibly rich in poly-phenolic antioxidants like leutin, xanthins and carotenesa. OMG! My new year's resolution is to eat more leutin, xanthins, and carotenesa, but then again, whose isn't?

I found this good-looking yam bread recipe in my trusty Bread Machine Magic cookbook. I changed the ingredients kind of a lot (which makes it my own recipe now, right?), increasing the milk, substituting pumpkin for the yams, cutting the butter down and adding peanut butter, and also including some whole wheat flour to boost the fiber a little more. This is more of a sandwich type of bread, not cakey like banana bread. It would be good toasted with some cream cheese or jam for breakfast.


Whole Wheat Pumpkin Bread (loosely based on I Yam What I Yam Bread from the Bread Machine Magic cookbook)
2/3 cup milk
1 egg
1/2 cup canned pumpkin
1/3 cup peanut butter
2 cups white bread flour
1 cup whole wheat flour
1 1/2 tsp. salt
1 Tbsp. butter
2 Tbsp. brown sugar
1/3 cup mini marshmallows
1 1/2 tsp. yeast
Put all ingredients in bread machine on dough cycle. Transfer dough to a bread-sized loaf pan and cook at 400 degrees for 25 minutes. Makes a 1 1/2 lb. loaf.

Janet's Notes: The kids ate this bread like there was no tomorrow. I planned to toast it and spread it with some cream cheese or jam but they ate it straight off the loaf. No butter, no nothing. I thought the marshmallows would stay chunky, like chocolate chips, but they melted away in the dough and just added a little more sweetness.

Friday, August 26, 2011

Chocolate Coconut Haupia Pie Inspired by Ted's Bakery

Elise with the original from Ted's Bakery (via Foodland supermarket).

Before I left for Hawaii a couple of weeks ago, I made sure I had all my important papers together. Plane tickets, check. Hotel reservation, check. List of the best places to eat on Oahu, cut out of a Sunset magazine article by my friend Trish, check and double check.

One of the must-try items on that list was the chocolate haupia pie from Ted's Bakery. We didn't make it to Ted's but did happen to see it prepackaged for sale in the grocery store, so I bought a piece to try. It was so good I knew I had to try recreating it at home.

For those who don't know, haupia is a firm coconut pudding. You make it in a pan and then cut it into squares and eat it with your fingers. It's a popular thing to have at luaus; the pie is a super easy and fun treat that would be great at a casual potluck or dinner party.


Janet's Chocolate Haupia Pie
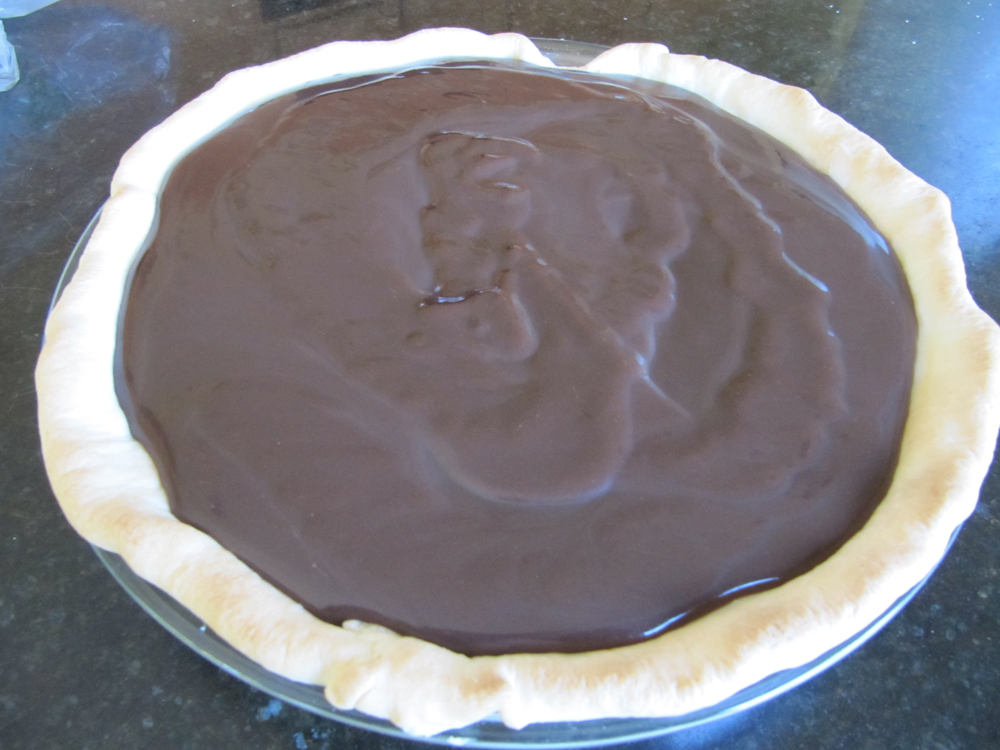
Make a one-crust recipe of your favorite pie crust, and pre-bake it. Pour the hot haupia into it and chill until set. Add your favorite chocolate pudding (I must confess to using a box of instant Jello chocolate pudding) and pour on top of haupia, again chilling until set.

Top with whipped cream and toasted coconut.


Cut one piece for the photo, then take the rest to your parents to ensure your status as favored child.

Haupia (source)

2 cups coconut milk
1-1/4 cups water
2/3 cups sugar
1/2 cup cornstarch

Combine the coconut milk and water. Stir until smooth. Add the sugar and cornstarch. Cook over low heat until thickened and shiny. If the haupia is grainy, you need to keep cooking the mixture because the fat in the coconut milk has not yet melted.

If you have any chocolate pudding left over, be sure to smear some on your face to resemble a goatee and mustache.


Wednesday, August 17, 2011

Rick Bayless' Pesto

This is one of my favorite cookbooks--it kind of straddles the kid/grownup cookbook because although Rick Bayless cooks with his teen daughter Lanie, there's not a fruit kabob or bagel faces recipe to be found. Praise be!

My favorite pesto comes from this cookbook--it's good for kids because the cream cheese mellows out the strong basil flavor.


Bayless Family Pasta with Pesto
1/4 c. pine nuts or walnuts
3 garlic cloves
2 c. fresh basil leaves
1/4 c. lemon balm, optional
1/3 c. olive oil
1/4 c. cream cheese or fresh goat cheese
1 Tbsp. lime or lemon juice
Salt
1 lb. dried pasta
1/2 to 3/4 c. grated Parmesan cheese

1. Scoop nuts into a small skillet. Set over medium heat. Stir until nuts release toasty aroma into kitchen, about 3 minutes. Remove pan from heat and let nuts cool.
2. Place peeled garlic in microwave-safe cup and barely cover with water. Microwave on high power for 1 minute. Scoop garlic out of water with spoon. Allow to cool.


3. In a food processor, combine cooled toasted nuts, basil leaves, lemon balm if desired, olive oil, cream cheese, lemon juice and 1/2 tsp. salt. Cut each garlic clove into 3 pieces and add to processor. Secure lid. Pulse 5 or 6 times, then run machine until mixture is smooth--about 1 minute. Leave pesto in food processor.
4. Boil pasta, reserving 1/2 cup cooking water. Pour reserved pasta water into food processor and turn on to thin the
pesto. Mix pesto with pasta. Sprinkle on half of the grated Parmesan. Divide onto plates and sprinkle with remaining Parmesan. Serves 4 as a main course.

Lucky me, to have a Dad who keeps me supplied with fresh lemon juice from his tree.

Monday, August 15, 2011

Super Easy Carnitas

When I cook for a crowd, I usually serve Mexican food. Do-it-yourself tacos or burritos are delicious, kid-friendly, and easy to prepare beforehand. Tonight it was carnitas.

The night before your party, put a couple of pork roasts (buy the cheap stuff) in your crockpot and season them with salt, pepper, cumin, onion, garlic, and chili powder. Cook them overnight, then in the morning let them cool and shred the meat.

A few minutes before the par-tay, pour a few tablespoons of oil in a large skillet and fry the carnitas so they get kind of crunchy. Put out tortillas, bowls of avocado, sliced onion, cheese, and salsa along with some beans and Mexican rice (don't forget a pitcher of Margaritas) and let the fiesta begin!

Monday, August 8, 2011

Happy Zucchini Day!


If you don't already have today off, you should. August 8 is "Leave Some Zucchini on Your Neighbor's Front Porch Day." Since my yard is small and my thumb black, I was hoping to be a leavee this year, but no luck so I headed to the farmstand and picked up a few to make my favorite enchiladas. I got this idea from a health food restaurant but never ordered them and never got a recipe, so let's wing it together, shall we?


Janet's Zucchini Enchiladas
6 corn tortillas
oil about 1/2" inch deep in a small skillet
1/2 cup chopped onion
1/2 cup zucchini, grated coarsely
1 cup Monterey Jack cheese, grated
1 can (10 oz.) enchilada sauce

Heat the oil and fry the tortillas for just a few seconds, until soft. Drain them on a plate lined with paper towels. Pour about 1/3 of the can of enchilada sauce to cover the bottom of an 8x8 square baking pan.


Lay out a tortilla and put some cheese, onion, and zucchini down the center.


Roll it up and place seam side down in the pan. Repeat with the other tortillas, then pour the rest of the sauce over the top. Make sure all the tortillas get some sauce on them so they don't dry out.


Sprinkle with more cheese and bake at 375 degrees for 15 minutes, until it's hot and the cheese is melted.

Janet's Notes: Be sure that the zucchini is grated coarsely. If it's too fine it'll get mushy and lose its texture. Also this would be good with green enchilada sauce but that would have required a trip to the store.


Wednesday, August 3, 2011

Sour Cream Rhubarb Bars


Did you ever see the 30Rock when they were at that Congressional hearing for the KableTown merger? All of a sudden there was a big revelation and everyone gasped and started taking and then they cut to Rob Reiner who was murmuring "rhubarb rhubarb peas and carrots peas and carrots rhubarb rhubarb." It still cracks me up but maybe you had to be there.

Anyway, my kids asked what rhubarb was--they had never heard of it. Far be it from me to deny my offspring the rhubarb experience, so I bought some at the store today and searched for a recipe. This one, from a Web site called The Rhubarb Compendium looked the best. And go ahead, admit that you don't know what a compendium is; I didn't either.


Sour Cream Rhubarb Squares
1/2 cup white sugar
1 Tbsp. butter
1 1/2 cups brown sugar

1 egg
1 teaspoon baking soda
1 cup sour cream
1/2 cup chopped nuts
1 teaspoon ground cinnamon
1/2 cup shortening
2 cups all-purpose flour
1/2 teaspoon salt
1 1/2 cups rhubarb, cut into 1/2 inch pieces

Preheat oven to 350 degrees F. Grease and flour 13 x 9 x 2 inch pan. Mix sugar, nuts, melted butter and cinnamon until crumbly and set aside.

He's easily amazed.

In a separate bowl, cream together brown sugar, shortening and egg. Add flour, soda and salt to creamed mixture alternately with sour cream. Lastly, stir in rhubarb.

Pour mixture into pan and sprinkle with reserved topping. Bake at 350 degrees F for 45 to 50 minutes. Cut in squares and serve warm or cool. Makes about 20 bars.

Janet's Notes: I guess I expected these to be like cookie bars; instead, they were more like a rhubarb coffee cake. They were great though, and Max declared that he loved them.

Tuesday, July 26, 2011

Best Chocolate Cake EVER

Elise's first fondant experience--not bad!

Max's cake for Papa and Grandma.

Shirtless wonder makes a cake!

Everyone has a few "specialty" recipes, and this is one of mine. It is frequently requested for potlucks and birthdays, and it really is the best chocolate cake I've ever had.

The best part is that it's all done in one bowl--dump everything in, stir it up, and pour it into the pans.


I prefer ganache to the cocoa frosting. Ganache sounds fancy but it's just cream and chocolate melted together. Make it a little thick to frost in between the layers, and thin it with a little more cream to pour over the top and sides of the cake. Super professional looking, and super decadent.

I think this kid's got a future in cake decorating!

This time I made it in small pot pie pans, so the kids (who have been watching way too much Cake Boss) could try using fondant.


If Oliver Twist gave you a cake, this is what he'd look like.

Monday, July 25, 2011

Whitestone Pizza (Plus Two)


Elise got a craving for Whitestone pizza the other day and once she mentioned it, I did too. This is our favorite kind of pizza: no tomato sauce, just olive oil, basil, and garlic brushed on the crust, then topped with mozzarella, parmesan, and dollops of ricotta. For the boys who are not really fans, I made regular sausage pizza and for kicks, made one more using leftover veggie burger crumbles and some chopped veggies. This last one was actually really tasty and I'll make it again.

Elise's Whitestone Pizza

Use your favorite pizza dough or crust. (We made our own dough in the bread machine, and par-baked it for about 5 minutes in a 425 degree oven.) Brush on olive oil, chopped basil, and a couple of cloves of minced garlic.

Top with cheese and bake for an additional 7-10 minutes, until the cheese is melted. But you probably know how to bake pizza already.

Trio of Za: Sausage/mushroom, Whitestone, and veggie-veggie (veggie burger crumbles with roasted vegetables)

Tuesday, July 19, 2011

Veggie Burgers

Better 'n beef!


You'd be surprised at how many really great recipes come from cookbooks for kids. I know this because I keep bringing them home from the library, hoping one (just one!) of my kids will catch the bug and we'll be one of those families you see in magazines, where the kids are happily peeling carrots and the parents are looking over fondly from the stove where they're stirring the spaghetti sauce. Not happening.

So I usually end up perusing the cookbooks myself and trying a few of the recipes that look interesting. My favorite veggie burger of all time comes from a book called Cooking With Herb, the Vegetarian Dragon by Jules Bass, given to me for my birthday in 2000 by my friend Jen. I have tried millions of veggie burgers recipes since then but always come back to this one.

The King's Favorite Veggie-Burger
1 cup fine textured vegetable protein (TVP)
1 carrot, scraped
1 large mushroom, chopped
1 small onion, chopped
1/2 small red sweet pepper, chopped roughly
1 garlic clove, squashed
Cooking oil spray and 1 Tbsp. cooking oil
2 egg whites and 1 egg yolk
1/2 cup breadcrumbs
1 cup hot water
In food processor, shred one carrot. Put a knife attachment in the processor bowl and add the mushroom, onion, and pepper. Turn on the machine and run it until the mixture's all ground up.


Pour 2 Tbsp. of cooking oil into a saucepot. Add the garlic and cook on a low heat. Add the contents of the processor bowl. Add salt and pepper to taste.

Cook for 10 minutes on a low heat, stirring every few minutes. Put the TVP in a small bowl and add the hot water. Stir and cover. Let sit for 5 minutes.

Textured Vegetable Protein, or TVP. I get it from the bulk section of our local Whole Foods-type store.

Add the TVP to the saucepot and mix well. Take it off the heat and mix in the eggs and breadcrumbs. Let it cool. Form into 4 burgers and refrigerate for at least a half-hour.


Spray a non-stick frypan with cooking oil. Over a medium-high heat, cook the burgers for 5 minutes on each side. Serve on toasted buns with ketchup.

Janet's Notes: The only criticism I have is that these burgers tend to fall apart when you grill them. Be gentle or try baking them like I did this time. I cooked them in a 350 degree oven for 20 minutes and they came out perfect.

Monday, July 11, 2011

Lobster Tails Like Cake Boss


My kids and I have recently discovered the TV show Cake Boss. I know we're late to the party, but wow! that guy is talented. We just watched this episode where Buddy makes a giant "Lobster Tail" pastry for an expectant mom who was craving them. They look amazing, and the moment Buddy called them "one of the hardest pastries to make" I knew I'd have to try.

For some reason I couldn't find this recipe laid out nice and neat in one spot. I had to do a ton of digging for different components, and watch the Cake Boss clip a few times to figure out what to do. There's apparently a very similar pastry called Sfogliatelle that's sometimes called Lobster Tail but it's baked with a ricotta filling inside and is not as crunchy. Buddy's is definitely crunchy and he keeps calling the filling "ice creamy" and says it's a blend of custard cream and whipped cream. He definitely fills it after it's baked, not before. He bakes the shells filled with a cream puff dough that makes the pastry rise in the oven and creates the pocket for the filling.

I pieced many recipes together to try to copy what he did and here's what I finally ended up with:

Lobster Tail Pastry like Cake Boss

Dough:
2 cups flour
1/2 tsp. salt
1/3 c. butter, cut into pieces
1/3 c. butter, melted
Water
1 Tbsp. sugar
2 eggs
Form into a ball and chill for two hours.

To roll pastry:
Remove dough from refrigerator. Divide into two equal parts. Place on a dusted pastry board (we just dusted our whole granite island with flour) and roll into an 18-inch square (Buddy used a pasta roller as long as he could, then stretched it manually after that to get it as thin as possible).
Brush the thin pastry with butter. Roll the dough into a tight log and cut into 3-inch slices. Pick up one piece of pastry dough in your hand. Press your thumb in the center of the pastry and push it down to form a hole like a cup. (This separates the layers and gives it the lobster tail look.) Put a little cream puff dough inside the cup and seal the top. Bake at 425 degrees for 15 minutes or until golden brown and puffy.
Custard Filling:
2 cups milk
1/4 cup sugar
2 egg yolks
1 egg
1/4 cup cornstarch
1/3 cup sugar
2 Tbsp. butter
1 tsp. vanilla

In a heavy saucepan, stir together the milk and 1/4 cup of sugar. Bring to a boil over medium heat. In a medium bowl, whisk together the egg yolks and egg. Stir together the remaining sugar and cornstarch; then stir them into the egg until smooth. When the milk comes to a boil, drizzle it into the bowl in a thin stream while mixing so that you do not cook the eggs. Return the mixture to the saucepan, and slowly bring to a boil, stirring constantly so the eggs don' t curdle or scorch on the bottom.

When the mixture comes to a boil and thickens, remove from the heat. Stir in the butter and vanilla, mixing until the butter is completely blended in. Pour into a heat-proof container and place a piece of plastic wrap directly on the surface to prevent a skin from forming. Refrigerate until chilled before using.
To make it into the "ice creamy" filling that Buddy describes, whip a cup of cream and fold it into this custard, then pipe it into the finished pastry and dust the whole thing with powdered sugar.

There's no patching this baby.

Attempt #1: Fuhgeddaboudit. It was impossible for me to get the dough this thin without tearing it, and then it was impossible to get the layers to separate enough to push it out into a lobster tail shape.

These look great but are secretly plotting to turn into rocks in the oven.

I ended up ditching the pasta roller and just rolled it as thin as I could by hand. It was easier to work with but it came out of the oven tough and hard, not flaky and crunchy. I shed a few tears, then went to the grocery store and bought some Phyllo dough.

In the middle of all this fun, little brother grabs the camera and takes big sister's picture. Can you guess from her expression what happened next?

Attempt #2: I stacked the Phyllo dough in 6-layer rectangles and rolled them up lobster-shell style. Baked them in the oven at 425 for 20 minutes, which turned out to be too long. I burned them.

Now I'm just pissed.

Attempt #3: I took the cream puff dough and plopped it out onto cookie sheets because now they're just going to be cream puffs. I'm over the whole lobster tail thing. I didn't really want to try them anyway.

I baked the cream puffs at 425 for 20 minutes and they were puffed and golden and amazing-looking. I set them on the rack to cool and they deflated in the next two minutes until they looked like frisbees.

Are you flippin' kidding me?

Vanilla pudding, anyone?

This is the only thing that came out well.
Luckily it can and will be a stand-alone (very alone) dessert.

The Verdict: Does anyone know a good Italian bakery?

Friday, July 8, 2011

Best Chocolate Chip Cookies EVER!


Do you know that urban legend about the Neiman Marcus cookies? A lady eats them in the store restaurant and asks for the recipe, and they say they'll charge her "two-fifty." She assumes $2.50 but when her credit card statement comes, she sees it's $250. She's so mad she posts the recipe all over the Internet. The story may be myth but the cookies are awesomely real! They make a huge splash anytime I serve them.

Elise made these cookies herself, but could not contain her creative side, and didn't believe me when I said they'd spread. These are goldfish cookies, tinted orange.

An underwater extravaganza! And I thought she was just making cookies.

The only downside to her doing it herself. Totally worth it.

Neiman Marcus Chocolate Chip Cookies
1 cup butter
1 cup granulated sugar
1 cup brown sugar
2 eggs
1 tsp. vanilla
2 cups flour
1 tsp. baking soda
1 tsp. baking powder
1/2 tsp. salt (I use the flakes because they're a little coarser and taste better in baked goods)
2 1/2 cup oats (grind it in a blender as fine as you can so the kids don't find it)
12 oz. chocolate chips

Cream butter and both sugars. Add eggs and vanilla. Mix together with flour, oatmeal, salt, baking powder, and soda. Add chocolate chips. Place tbsp. sized dollops about 2 inches apart on an ungreased cookie sheet. Bake at 375 degrees for 9-11 minutes.

Janet's Notes: Try to slightly underbake these cookies, kind of like you would for a gooey brownie. They should look just barely underdone when you take them out of the oven.