Thursday, March 31, 2011

Warts and All

Sean biffing it while his friends cry with laughter at his expense.

Elise, happy to get a hug from her brother.

Max (right), cheating on his homework.

One of my blog readers paid me a compliment today. Was it on my crystal clear photography? Hardly. My brilliant cooking techniques? Think again. “Thank you,” she said, “for not portraying your family as ‘sparkly.’” And you know, it’s one of the nicest compliments I’ve received in a long time.

With the divorce rate in America hovering around 50%, how is it that nearly every person you meet on the Internet has married their soulmates, and gone on to have perfect children who spend most of their time sitting Indian style with their hands in their laps?

When I was pregnant with my second child, I worried all the time. Would my baby be born healthy? Would my son hate his new sister? Could I manage it all? When I confided in an acquaintance, she looked at me like I was crazy. No, she never worried, she said. Everything was great, always was and always would be. When I relayed this conversation to my friend Amy, she responded this way: “Moms like that are dangerous. Do not talk to her ever again.

So here’s to my family—my husband who has never surprised me with a romantic getaway but will nearly always go downstairs to get me a glass of water. My sweet 15-year-old son who has yet to learn how to use a napkin. My 12-year-old daughter who was voted “most compassionate” by her classmates but rolls her eyes and stiffens in the most infuriating way if her little brother tries to hug her. And of course, my 8-year-old boy who sometimes “just wants to be with me” but who will never learn to say “excuse me” instead of “safety” when he, you know (which is a problem as well). Warts and all, I wouldn’t trade them for the world.

Amazing what a trip to Disneyland and a caramel apple will do for familial harmony.

Wednesday, March 30, 2011

Back of the Box: Oven-Fried Chicken

Today's back of the box recipe is a pretty standard idea but you can count on the fact that your kids won't make yuck faces when you serve it. How's that for a glowing review?

Oven-Fried Chicken
2 Tbsp. butter, melted
2 large eggs, beaten
2 Tbsp. milk or water
1/2 cup Albers white corn meal (yellow is fine too, it's just a different box)
1 cup flour
1 1/2 tsp. salt
1 1/4 tsp. paprika
3/4 tsp. garlic powder
3/4 tsp. black pepper
2 1/2 - 3 lbs. chicken, cut up and skinned


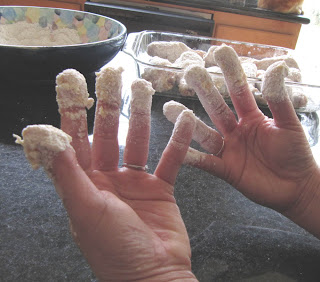
Preheat oven to 400 degrees. Melt butter in a glass casserole dish. Combine eggs and milk in a medium bowl. Combine dry ingredients in another bowl (I'm kind of making this up since I threw away the box and cut off part of the instructions when I took the photo. It's pretty basic.). Dip chicken in egg mixture, then into corn meal mixture.

Pretend to hug your kids with your dough-ball fingers.


Place chicken in buttered casserole and bake 45-50 minutes, until chicken is done. About halfway through baking, baste tops of chicken with pan juices so they will brown.

I served this with steamed broccoli and roasted purple sweet potatoes that I got at the Asian market. They were actually the best part of the meal, and as soon as I go back there (the store is in San Diego, about 30 minutes away) I'm going to do a post about them too.

Tuesday, March 29, 2011

Magnet Spice Rack/Bulletin Board

I have spice issues; they've been out of control for some time now, and I'm finally ready to admit my problem and conquer it.

Some of my friends like Pottery Barn; others spend their time at Anthropologie. But give me Home Depot any day.

I cleared out a drawer full of spice packages and bottles, and put them into these cool magnetic containers from World Market. Now all I needed was a magnet board to hang them on. Unwilling to settle for a plain boring metal sheet, I browsed the aisles of Home Depot until I found these. They were in the "vent" section and came in several sizes; these are about 15"x8".


I made some labels on clear decal paper and filled my jars.

With my spice issues are under control, I was inspired to tackle the space issues over my desk as well. Now, if only the kids' clothes and toys were magnetic...

Sunday, March 27, 2011

Fresh Ahi Sandwiches

These are my parents. If they look awesome, it's because they are.
Just don't ask why Dad is holding a stuffed walrus.

About two Christmases ago, my well of parent gift ideas finally ran dry. (Of course, this should never happen to you because of my previous shameless plug post.) When even an emergency stop at Rite-Aid on Christmas Eve failed to turn up anything, I resorted to designing and printing up a page worth of free dinner coupons, you know, the kind you used to make for your parents when you were a kid.

My mom's a great cook but everyone who loves cooking knows that it loses its magic when you have to do it every night, and usually for a family with at least one picky eater. Now entering its third year, this gift has become a new tradition. (And trust me, if your dad is shifty like mine, you'll want to include the "no photocopying" stipulation. I learned this after year one.) Another stipulation: the food can't be "weird." Once I shared the most delicious goat cheese and ratatouille phyllo turnovers. Dad's comment: "Don't you ever make anything normal?" Now that I think about it, I'll post that recipe soon; just not in the Mom and Dad category.

Tonight's meal was fresh grilled ahi tuna sandwiches with homemade baked beans. I marinated the fish in 1/4 cup olive oil, 3 Tbsp. soy sauce, 1/2 small diced onion, 2 cloves minced garlic, and 3 Tbsp. Italian seasoning for about 3 hours. I grilled it on a cast iron grill pan, and served it on a homemade bun (thanks, bread machine!) with lettuce, onion, and tomato. I made a quick spicy tartar sauce with 1/2 cup mayo, 1 Tbsp. Sriracha chili sauce, 2 Tbsp. ketchup and 2 Tbsp. pickle relish.

The side dish was Baked Bean Quintet, photocopied from an unknown cookbook many years ago at an office potluck.

Baked Bean Quintet

6 pieces sliced bacon (I never use this)

1 cup chopped onion

1 clove garlic, minced

1 16-oz can butter beans, drained

1 16-oz. can lima beans, drained

1 16-oz. can pork and beans in tomato sauce

1 16-oz. can red kidney beans, drained


1 16-oz. can garbanzo beans, drained

3/4 cup ketchup

1/2 cup light molasses

1/4 cup packed brown sugar

1 Tbsp. Worcestershire sauce

1 Tbsp. prepared mustard

1/4 tsp. pepper

In a skillet, cook bacon til crisp. Remove bacon, reserving 2 Tbsp. drippings in skillet. Drain and crumble bacon; set aside. Cook onion and garlic in reserved bacon drippings til onion is tender but not brown; drain. In a large bowl combine crumbled bacon, onion, garlic, and all beans. Stir in ketchup, molasses, brown sugar, Worcestershire sauce, prepared mustard, and pepper. Turn into a 2 1/2 quart casserole. Cover and bake in a 375 degree oven for 1 hour or til heated through. Makes 12 to 14 servings.

* Janet's Easy Way: Eliminate bacon; dump all other ingredients in a crockpot and cook on low for 8 hours. Way easy. Also, don't worry about getting the beans the recipe calls for; any 5 kinds of beans are fine.

Friday, March 25, 2011

California Rolls!

Making sushi is daunting to most people but don't fear the roll: it's time-consuming but not difficult. Really, the hardest part is watching how fast they disappear versus how long you spent making them.

Cook 3 cups of rice. You want sticky rice, which is either called (wait for it) sushi rice, or just short-grain rice. While it's cooking, mix together about 1/3 cup of seasoned rice vinegar (Marukan brand is easily found in the Asian section of our grocery store) and about a Tablespoon of sugar, or to taste. Some people like their rice sweeter than others.

Your other ingredients are nori (seaweed) sheets and anything you want to use as filling.

I used strips of cucumber that I soaked for about an hour in a little of the seasoned rice vinegar, sliced avocado, and some surimi mixed with mayo.


As soon as the rice is done, transfer it to a large bowl and drizzle the vinegar mixture in a steady stream while stirring the rice. Professionals like to fan the rice as they stir because they say it keeps the rice from getting gummy; I don't worry about it.

Now open up your bamboo mat. What, no bamboo mat? Then you need to throw all your fillings into your seasoned rice and eat it with a spoon, then take a trip to the Asian market and start over. You need this to roll the sushi. Lay a piece of nori on the mat, then spread your hot rice to the edges of the mat horizontally, but leaving about an inch on either end so that when you roll the sushi, rice won't come out the top of the seaweed.
Lay your ingredients in the center of the rice, then give it one fold over so that everything's encased. Now give the whole mat a good squeeze so it holds together, then continue to roll til you get to the end.

This is what happens if you spread your rice too far to the top edge of the nori.


Look at them beautiful sushis! Cut them with a serrated knife dipped in water before each cut. This will keep the sushi neat and not looking like you cut them with a hacksaw. In our house the ends are the sole property of the chef, not to be eaten by any non-helpers.

Dinner is served, if they last that long.


Wednesday, March 23, 2011

Down the Drain (Or Maybe Not)

I have a confession to make: I floss and brush my teeth in the shower. I do it because I really really really love long hot showers but don't like to waste water, so I figure if something is getting done while I'm standing there, it's OK. (Man, that excuse sounded so much better in my head.)

So a couple of months ago I noticed that there was a long strand of floss that had caught on the shower drain. It had wrapped itself around the grate and the ends were hanging down into the pipe. I pulled it out so it wouldn't wash away and when I did, about two heads' worth of hair came with it. It was completely gross, yet so oddly satisfying, like pouring out a bucketful of black water after shampooing the carpet (I swear they put black dye in that machine).

I replaced the floss with another strand, this time making it really long and tying it in a knot on the grate so it wouldn't accidently wash down the pipe and collect all that hair underground. Works like a charm, and now we can cancel my daughter's buzz cut appointment and let her keep her long (see photo above) beautiful hair.

Tuesday, March 22, 2011

Lotsa Laksa

So in yesterday's post I mentioned Anthony Bourdain's awesomeness. I have loved him since he took me (figuratively, darn) to Malaysia in his show No Reservations and introduced me to laksa. This Malaysian noodle soup is a serious contender for best soup EVER. It's great to make these days, when everyone has that cold that hangs on for three weeks. What's the deal with that, anyway?

To make the paste, soak 6 dried chiles with stems and seeds removed (I used Ancho because they were the only ones I could find--they are very mild but you may want some that have a little more kick to them) in boiling water until they're soft. Grind them in the blender with a little of the soaking water, a couple cloves of garlic, about half a medium-sized onion, 5 macadamia nuts (I know you--you're tempted to leave this out but don't; it adds a good texture to the soup), a 2-second squirt of fish sauce, juice from half a lemon, about a teaspoon of salt, and a thumb's length of peeled ginger.

When the paste is smooth, get your soup pot hot and add a little oil, then fry the laksa paste a couple of minutes, until it is fragrant. Add 2 cans of coconut milk (make sure it's the unsweetened kind) and 3 cups of chicken broth, and simmer the soup for about 15 minutes. What you have now is known as "laksa gravy." Add whatever meat you'd like (I always choose tofu and usually a pound of shrimp as well) and continue to simmer until the meat is cooked.


While your gravy is simmering, start your noodles--use rice sticks that you find in the Asian section of your grocery store. Don't boil the rice sticks the way you would cook pasta; they'll get mushy. Just pour boiling water over the dry noodles and let them sit for a couple of minutes, until tender but still with a good bite.

To serve, put a good chunk of noodles into your bowl, ladle the gravy over, and garnish with bean sprouts, green onions, and Sriracha chili paste. A good squeeze of lime can't hurt either.

Guaranteed to clear your sinuses so you can get back to work...or not.

Book Review: Born Round

I am a big fan of the "foodie" book--loved Julia Child's My Life in France and anything by Ruth Reichl. And of course Anthony Bourdain, who's completely awesome because in his latest book Medium Raw he devotes an entire chapter to the people he loves and hates, and specifically why he loves and hates them. Who does that?

But I digress. Born Round is the story of a chubby boy born into a large Italian family who shows their love through food. He grows up struggling with his weight (at one point refusing his grandmother's fried fruit pies, which she interprets as him not loving her) and becomes a journalist. When he is offered the position of New York Times food critic, he is forced to come to terms with food, and the way he looks at it.

This is a great vacation read--intelligent and funny but easy to put down and pick back up. Frank Bruni is totally self-deprecating and brutally honest about his food issues.


My favorite line in the story comes when a collegiate Frank embarks on a wilderness camping trip that includes a long, difficult hike. When he balks, the counselor says, "There are things you are glad to do, and things you are glad to have done." I now think this every time I hit the snooze button when I should be getting up to go to the gym. Damn you, Frank.

Also fascinating is how Frank is treated as a food critic, and the lengths some restaurants will go to a) identify the food critic, and b) try to get a good review from said food critic. An interesting look at the world of fine dining and how much those reviews mean to these places.

Janet's review (on a scale of blech to yay): a hearty nod yes with half a fist-pump.

Monday, March 21, 2011

Back of the Container: Ricotta Pancakes

My son, carbo-loaded on Ricotta Pancakes at his very first high school track meet. Look at that kid fly!

My son is running track and had his first meet ever on Saturday. I have heard of "carbo loading" but as a nervous newbie track mom, may have gone a little overboard. I made lasagna and then had about half a container of this cheese left, turned it over and saw a recipe for Heavenly Ricotta Pancakes. More carbs! Why not?

The recipe calls for 1 1/4 cup complete pancake mix (bleh), 1 1/3 cups milk, and 1 cup ricotta. I used my failproof Fannie Farmer pancake recipe (I'm sure you have a favorite too) and just added the cup of ricotta to the batter, and cooked as usual.

Your batter will be thicker than normal.

The thicker batter will make about a dozen pancakes, but since they were dessert for us, it was enough.

I threw about 2 cups of frozen blueberries in a small saucepan and added 1/4 cup of water, 1/4 cup sugar, and simmered them for about 5 minutes. I thickened the sauce with a cornstarch/water slurry (about 1 teaspoon cornstarch to a few Tablespoons water), poured it on top of the pancakes, and dusted it with powdered sugar.

These were so good. They were really tender and light and quick to make. And speaking of light and quick, I'd like to say that photo of my son running all alone was him way out in front of the competition because of his mama's love, but in actuality he was bringing up the rear. Oh well. He was the cutest.

Sunday, March 20, 2011

Stylish Blogger Award

My very first follower Jennifer, at http://www.jennizart.blogspot.com/, who happens to be a very talented artist, has given me the "Stylish Blogger Award." Thanks Jennifer, and in the Stylish Blogger tradition (I'm sure you know), I will post 7 factoids about myself and then pass it on to other deserving bloggers.

1. I live in Sunny California but love cloudy, cold weather. When I asked my husband why we live here he said, "Because it's so expensive?"

2. Sweet peas are my favorite flower.

3. I know the letters of most of my friends' license plates, yet if you ask me what I did this weekend I won't remember.

4. My ultimate dream is to start an animal sanctuary for dogs and cats.

5. I usually paint my toenails blue.

6. I love Jack in the Box tacos.

7. I ran a half marathon in January, then came home and threw up.

Now to pass on the award:

Friday, March 18, 2011

Won Tons Like Mom Used to Make

Well, like Mom used to make if your mom is Chinese. Which mine is. This recipe is very much a traditional family recipe in that it is one of those "some of this" and "a splash of that." It's very forgiving so just give it your best shot and I promise it'll be delicious.

Mama May's Won Tons
Filling:
1 lb. ground pork (I use ground turkey sometimes and nobody notices)
1/4 c. each onion, celery, carrot, and water chestnuts, chopped fine
1 generous splash soy sauce, or as we call it, shoyu
1 package won ton wrappers (you will probably have enough filling left over to fill two packs of wrappers, or just put the leftover filling in the freezer for another batch later)

Saute the veggies in a little oil, then add ground meat and shoyu. Cook until it's done, and let it cool for a while before you fill the won tons.

If you can get your kids to help you make these it's a lot less tedious. If you make them by yourself it will seem like every time you make a won ton, two more skins appear in the package. Give each person helping a plate and a small dish of water, and set a large "done" plate in the center of the table.

Put a small amount of filling in the center of each wrapper. Don't put too much or it'll be hard to fold and seal.


Dip your finger in the water and run it along two connected sides of the wrapper. Fold over diagonally, corner to corner and seal the edges together well. You don't want filling leaking out when you fry them.

Pick up the folded won ton and put a little water on the back of the right corner. Bring the right corner forward and bring it over to the left so that the back of the right corner seals to the front of the left corner. Put the third finger of your left hand in the center to make a little dent as you seal the corners. (Is that hard to understand? This is why I did not become a teacher...)

What a gorgeous pile of won tons you have made! Fry them in a couple inches of oil and try not to eat them all before you serve them. (You can also put these into broth and make won ton soup.) Dip them in some sweet chili dipping sauce that you can find ready made in the asian section of the market, or a mixture of shoyu and mustard. My kids just like them plain.

Wednesday, March 16, 2011

Custom Tile Table

When it comes to redecorating, it's amazing what you can accomplish with a can of black spray paint. I found this TV tray at a garage sale for a dollar. It had a super groovy retro fake wood grain but once I sprayed it black, it looked great, clean but with the retro lines. To make this project, look for a table with a small lip around the edges--they're not as hard to find as you'd think.

When you are Home Depot picking up that black spray paint, get some tiles (I used 4"x4"). You'll also need tile adhesive, grout, a sponge, and spacers. How you lay it out is up to you but I jazzed it up with a sheet of this stuff, which I found on clearance for about $7 a sheet. The 1x1" tiles not only finish off the look well, but also fill the space if your tiles don't fit quite perfectly. I'm not going to explain how to lay tile--there is plenty of info about that on the Web, plus I have to pee.

Now the boring part is over--look through your kids' drawings and choose as many as you want to put on your table. (I recommend using the one that Jr. drew of your husband with no neck, but not the one of you that makes you look really fat.) Scan them into your computer and resize them so they're roughly the same.

Now here's where my shameless plug comes in: if you want them to be totally permanent and scrubbable, contact me at sales@customsepia.com or through my Etsy site Custom Sepia and I'll fire your images onto 4x4 square white or cream tiles. (You can also use these tiles for your kitchen backsplash or in your bathroom shower or tub.) If you want to keep this project totally DIY, print your images onto these decals and affix them to the tiles. If you go this route, you will want to use a sealer to preserve the images.

You will be amazed at the compliments you get from this project, and your friends will envy how talented your children are, and isn't that really what it's all about?

Tuesday, March 15, 2011

Back of the Can: Orchid Coconut Milk

I'm starting a new regular feature today. About once a week I'm going to cook a recipe that comes on the back of the can/box/package. You know, those recipes that you never cook, or even consider cooking. Who knows, maybe there are some gems out there.

Today it's Orchid Coconut Milk.
Pa-Naeng Neua (Beef curried in sweet peanut sauce)

400 grams beef, cut into thin strips (I don't know how much this is but I used 1 lb.)
2 cups coconut milk (Why your recipe would call for 16 oz of coconut milk when your can contains 14 oz. I'll never understand...)
1 thinly sliced red spur chilli (sic)--what is this? A little chopped jalapeno will have to suffice
1/2 cup ground roasted peanuts
6 kaffir lime leaves, torn into pieces (I put in a little lime juice and zest instead of the leaves)
3 Tbsp. sugar
1/2 tsp. salt
2 1/2 Tbsp. fish sauce
1/4 cup sweet basil
3 Tbsp. pa-naeng curry paste (I used green curry paste because it's what I had)

What it says to do: Put 1 cup coconut milk over medium heat until some of the oil surfaces, add the curry paste and slowly bring to a boil, stirring constantly. Put in meat strips and cook for 5 minutes, add 1 cup coconut milk. Meanwhile, in a bowl, mix the rest of the ingredients except lime leaves. Add this to the curried meat, stir well and simmer about 15 minutes. Add the lime leaves, sweet basil, and remove from heat.

What I actually did: Pour entire can of coconut milk in pot; heat for about two minutes until you get bored of waiting for oil to surface, then put in curry paste, meat, and all other ingredients except basil. Throw in some chopped bell pepper and onion because beef and coconut milk do not satisfy your childrens' nutritional daily requirements. Simmer for about 15 minutes, then add basil.

The verdict: This was surprisingly delicious. I was so ready to bag on the idea of just throwing a bunch of stuff into broth without sauteeing anything first but cooking the beef in the liquid gave it a great flavor. And the whole thing took me literally 5 minutes to prep, and then 20 minutes total cooking time (mostly simmering which leaves you free to clean the kitchen). A back of the can winner!